📌 学习笔记 :本文为学习与实践过程中整理的技术笔记,内容梳理自官方文档与网络公开资料,主要用于知识沉淀与命令速查。
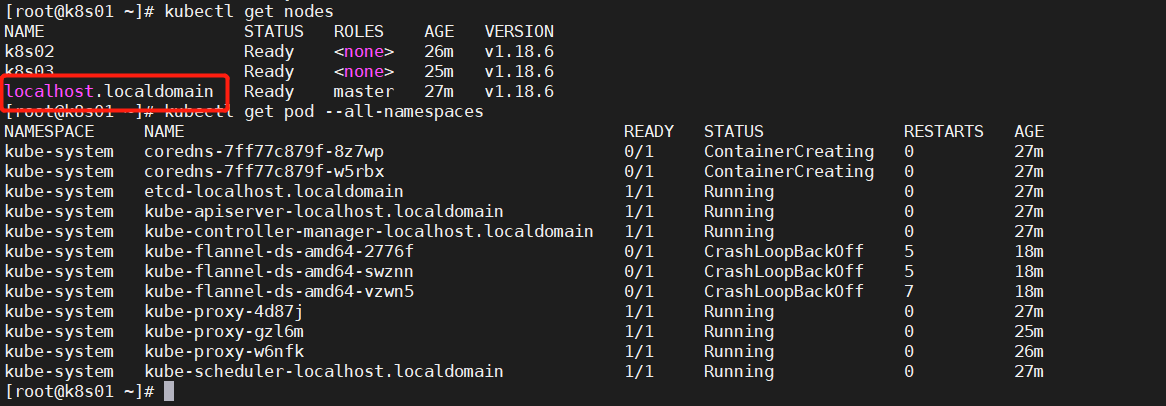
master主机名错误 没有修改主机名就进行了 kubeadm config print init-defaults > kubeadm_init.yaml
配置文件节选
⚠️ 注:criSocket: /var/run/dockershim.sock 为旧版写法。dockershim 已在 Kubernetes 1.24 移除,新版请使用 containerd 等 CRI 运行时,socket 路径为 unix:///run/containerd/containerd.sock(即 /run/containerd/containerd.sock)。
1
2
3
4
5
6
nodeRegistration: criSocket: /var/run/dockershim.sock name: loaclhost.localdomain taints: - effect: NoSchedule key: node-role.kubernetes.io/master
Unable to connect to the server: x509: certificate signed by unknown authority 配置文件没有删除干净
先执行
1
2
yes|kubeadm reset # 所有节点执行,重置 rm -rf $HOME/.kube # master 节点
然后
1
2
3
4
5
kubeadm init --config kubeadm_init.yaml mkdir -p $HOME/.kube sudo cp -i /etc/kubernetes/admin.conf $HOME/.kube/config sudo chown $(id -u):$(id -g) $HOME/.kube/config source <(kubectl completion bash) # 自动补充
ImageInspectError 1 2 3 [root@k8s01 ~]# kubectl get pods --all-namespaces|grep Inspect kube-system coredns-7ff77c879f-k66n8 0/1 ImageInspectError 0 22m kube-system coredns-7ff77c879f-vhbph 0/1 ImageInspectError 0 22m
删除重新部署
1 2 3 4 5 6 7 8 9 10 11 12 13 14 [root@k8s01 ~]# docker rmi registry.aliyuncs.com/google_containers/coredns:1.6.7 Untagged: registry.aliyuncs.com/google_containers/coredns:1.6.7 Untagged: registry.aliyuncs.com/google_containers/coredns@sha256:695a5e109604331f843d2c435f488bf3f239a88aec49112d452c1cbf87e88405 Deleted: sha256:67da37a9a360e600e74464da48437257b00a754c77c40f60c65e4cb327c34bd5 Deleted: sha256:995fd0f6e0d57be9165b3568d9a9c5de6b0c138d36740727001a2e3cb0401035 Deleted: sha256:225df95e717ceb672de0e45aa49f352eace21512240205972aca0fccc9612722 [root@k8s01 ~]# docker pull registry.aliyuncs.com/google_containers/coredns:1.6.7 1.6.7: Pulling from google_containers/coredns c6568d217a00: Already exists ff0415ad7f19: Pull complete Digest: sha256:695a5e109604331f843d2c435f488bf3f239a88aec49112d452c1cbf87e88405 Status: Image is up to date for registry.aliyuncs.com/google_containers/coredns:1.6.7 registry.aliyuncs.com/google_containers/coredns:1.6.7
部署 dashboard 时,提示权限问题 eg:
1 2 3 customresourcedefinitions.apiextensions.k8s.io is forbidden: User "system:serviceaccount:kubernetes-dashboard:kubernetes-dashboard" cannot list resource "customresourcedefinitions" in API group "apiextensions.k8s.io" at the cluster scope secrets is forbidden: User "system:serviceaccount:kubernetes-dashboard:kubernetes-dashboard" cannot list resource "secrets" in API group "" in the namespace "default" services is forbidden: User "system:serviceaccount:kubernetes-dashboard:kubernetes-dashboard" cannot list resource "services" in API group "" in the namespace "default"
需要修改配置文件
⚠️ 注:rbac.authorization.k8s.io/v1beta1 已在 Kubernetes 1.22 移除,新版请使用 apiVersion: rbac.authorization.k8s.io/v1(字段完全兼容)。
1 2 3 4 5 6 7 8 9 10 11 12 13 14 apiVersion: rbac.authorization.k8s.io/v1beta1 kind: ClusterRoleBinding metadata: name: kubernetes-dashboard namespace: kube-system roleRef: apiGroup: rbac.authorization.k8s.io kind: ClusterRole ## 赋予clusterrole cluster-admin的权限 name: cluster-admin # 默认配置 kubernetes-dashboard ,只授予了此 namespaces 的权限权限 subjects: - kind: ServiceAccount name: kubernetes-dashboard namespace: kubernetes-dashboard
api 版本不对
⚠️ 注:本节记录的是旧版本(k8s 1.18 前后)现象——当时 CronJob 仅 batch/v1beta1 可用,故此处把 batch/v1 改回了 batch/v1beta1。新版集群上结论相反 :CronJob 自 1.21 起稳定为 batch/v1,batch/v1beta1 已在 1.25 移除,应统一使用 apiVersion: batch/v1。
过程
1 2 3 4 5 6 [root@k8s01 stroage]# cat CronJob_test.yaml # 节选 apiVersion: batch/v1 kind: CronJob [root@k8s01 stroage]# kubectl apply -f CronJob_test.yaml error: unable to recognize "CronJob_test.yaml": no matches for kind "CronJob" in version "batch/v1"
排查过程 kubectl api-resources 查看 api 版本信息
1 2 3 4 5 6 7 8 9 10 [root@k8s01 stroage]# kubectl api-resources |grep CronJob cronjobs cj batch/v1beta1 true CronJob # 修改 [root@k8s01 stroage]# cat CronJob_test.yaml # 节选 apiVersion: batch/v1beta1 kind: CronJob root@k8s01 stroage]# kubectl apply -f CronJob_test.yaml cronjob.batch/hello created
pod 一直处于 pending 状态 kubectl describe
1 2 3 4 5 6 7 QoS Class: Burstable Node-Selectors: application/env=quant Tolerations: test:NoExecute Events: Type Reason Age From Message ---- ------ ---- ---- ------- Warning FailedScheduling 9s (x20 over 4m) default-scheduler 0/4 nodes are available: 3 Insufficient memory, 3 MatchNodeSelector.
打了污点 和 容忍度 发现合适的节点内存不足
待调度的 pod 信息节选
1 2 3 4 5 6 Limits: cpu: 2 memory: 10Gi Requests: cpu: 2 memory: 5Gi
查看主机的内存
1 2 3 4 [root@k8s03 ~]# free -h total used free shared buff/cache available Mem: 15G 1.5G 196M 908M 13G 12G Swap: 0B 0B 0B
发现内存是 满足的
经过定位发现,有多个 pod 都处于 pending, 因为 存在 request 保证之前 pod 的内存使用量,导致新的 pod 无法调度
待调度 pod 的 request 值总和超过该节点提供的空闲资源, 不会调度到该节点 node 上;
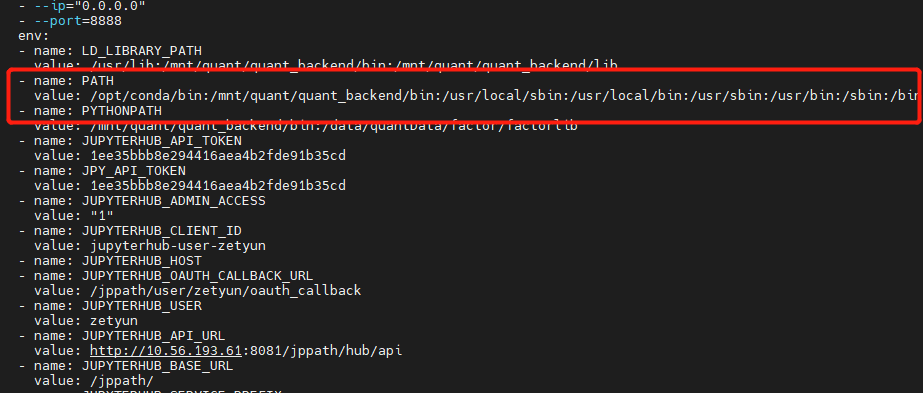
Error response from daemon: OCI runtime create failed Error response from daemon: OCI runtime create failed: container_linux.go:345: starting container process caused "exec: \"tini\": executable file not found in $PATH"
此问题定位起来很复杂, 此 pod 在 新建用户时,会自动创建一个 pod, 但 pod 会启动失败,随即被删除。
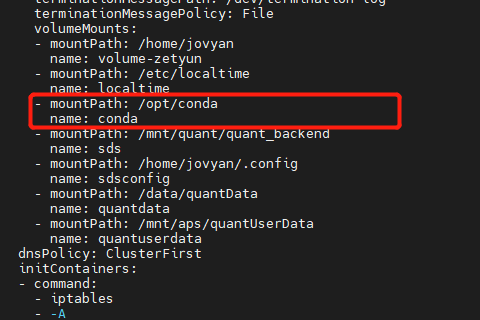
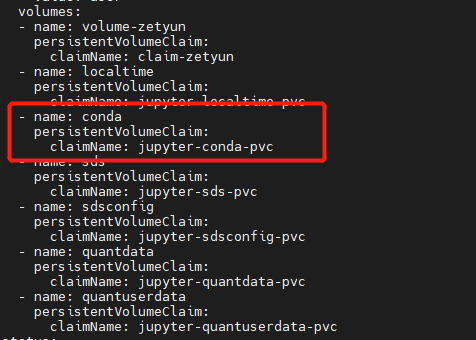
后来发现有 pod 创建, 需要 的 PATH 缺少 conda文件,补充文件到指定目录下,重启成功
pod 被驱逐,提示DiskPressure 磁盘空间不足,导致 /var 目录满了
运行的 pod 用了 emptyDir ,emptyDir 使用的空间是 /var/lib/kubelet/pods/podxxxxx 。 pod 被删除后,目录被清空。所以看不到 实际空间被占用. 需要扩容 /var 目录
EvictionThresholdMet Attempting to reclaim nodefs 某个node notReady, describe node 后提示 Warning: EvictionThresholdMet Attempting to reclaim nodefs
资源不足
在 失败节点 df -Th 发现根目录已满
du -h / –max-depth=2
发现有个日志文件 有 300多G , tail -f 发现还在暴增,并且提示 socket too many open files
网络连接问题,查看 ulimit -a open files 设置的足够大
1 2 [root@test173 ~]# ulimit -n 655360
代码错误
ns 无法删除,一直处于 termning 状态 ns 为 rook-ceph
1 2 3 4 5 6 7 8 [root@test-173 ~]# kubectl get ns |grep Terminating rook-ceph Terminating 13h [root@test-249 ~]# kubectl api-resources --verbs=list --namespaced -o name | xargs -n 1 kubectl get --show-kind --ignore-not-found -n rook-ceph NAME ACTIVEMDS AGE cephfilesystem.ceph.rook.io/test 1 34m
发现此 crds 无法删除
1 2 3 4 5 6 7 8 9 kubectl patch crds cephfilesystems.ceph.rook.io -p '{"metadata":{"finalizers": []}}' --type=merge kubectl patch -n rook-ceph cephfilesystem.ceph.rook.io myfs -p '{"metadata":{"finalizers": []}}' --type=merge kubectl patch -n rook-ceph secret rook-ceph-mon -p '{"metadata":{"finalizers": []}}' --type=merge kubectl patch -n rook-ceph configmap rook-ceph-mon-endpoints -p '{"metadata":{"finalizers": []}}' --type=merge kubectl patch -n rook-ceph cephcluster.ceph.rook.io rook-ceph -p '{"metadata":{"finalizers": []}}' --type=merge kubectl patch -n rook-ceph cephblockpool.ceph.rook.io replicapool -p '{"metadata":{"finalizers": []}}' --type=merge kubectl patch -n rook-ceph cephblockpool.ceph.rook.io/replicapool -p '{"metadata":{"finalizers": []}}' --type=merge kubectl patch -n rook-ceph cephobjectstore.ceph.rook.io/my-store -p '{"metadata":{"finalizers": []}}' --type=merge kubectl patch -n rook-ceph cephobjectstoreuser.ceph.rook.io/my-user -p '{"metadata":{"finalizers": []}}' --type=merge
然后顺利删除
1 [root@test-249 ~]# kubectl get ns |grep Terminating
或者
1 2 3 [root@hdp01 examples]# kubectl api-resources --verbs=list --namespaced -o name | xargs -n 1 kubectl get --show-kind --ignore-not-found -n rook-ceph edit 资源,改 finalizers: []
实在无法删除,可以尝试 直接从 etcd 删数据(不建议)
1 2 etcdctl get --prefix /registry/namespaces/ etcdctl del --prefix /registry/namespaces/xxxxxx
业务 pod 一直 CrashLoopBackOff, 重启,Liveness probe failed 很多 容器 只有最基础的 命令, 可以使用 debug 容器
下面是在宿主机上操作
1 Liveness probe failed: dial tcp 100.103.203.89:8887: connect: connection refused
能 ping 通
1 2 3 4 [root@imwl-175 ~]# ping 100.103.203.89 PING 100.103.203.89 (100.103.203.89) 56(84) bytes of data. 64 bytes from 100.103.203.89: icmp_seq=1 ttl=63 time=0.584 ms 64 bytes from 100.103.203.89: icmp_seq=2 ttl=63 time=0.531 ms
telnet 失败
1 2 3 [root@imwl-175 ~]# telnet 100.103.203.89 8887 Trying 100.103.203.89... telnet: connect to address 100.103.203.89: Connection refused
扫描端口是关闭的
1 2 3 4 5 6 7 8 9 [root@imwl-175 ~]# nmap -p 8887 100.103.203.89 Starting Nmap 6.40 ( http://nmap.org ) at 2021-04-15 07:57 UTC Nmap scan report for 100.103.203.89 Host is up (0.00067s latency). PORT STATE SERVICE 8887/tcp closed unknown Nmap done: 1 IP address (1 host up) scanned in 0.46 seconds
节点下线 1 2 3 4 5 kubectl cordon 192.168.250.101 # 设置不可调度 kubectl drain 192.168.250.101 # 驱逐节点 --ignore-daemonsets # kubectl delete node 192.168.250.101 # 删除节点 然后重启 kubectl uncordon 192.168.250.101 # 恢复调度
k8s 中 command、args 和 dockerfile 中 entrypoint、cmd 之间的作用 当用户同时在kubernetes中的yaml文件中写了command和args的时候,默认是会覆盖DockerFile中的命令行和参数,完整的情况分类如下:
1、如果command和args都没有写,那么用DockerFile默认的配置。
2、如果command写了,但args没有写,那么Docker默认的配置会被忽略, 而且仅仅执行.yaml文件的command(不带任何参数的)。
3、如果command没写,但args写了,那么Docker默认配置的ENTRYPOINT的命令行会被执行,但是调用的参数是.yaml中的args。
4、如果如果command和args都写了,那么Docker默认的配置被忽略,使用.yaml的配置
不小心删除掉了重要的 namespaces 因为 etcd 每日凌晨都有备份, 从 etcd 中恢复
停止 master 的 kube-apiserver
1 2 3 systemctl stop kube-apiserver # mv /etc/kubernetes/manifests /etc/kubernetes/manifests.bak # 当使用 kubeadm 时
停止 etcd
备份原有数据
1 mv /var/lib/etcd/data /var/lib/etcd/data.bak
恢复 etcd (所有 etcd 节点执行,可用同一份文件恢复)
1 2 3 4 5 ETCDCTL_API=3 etcdctl snapshot restore etcd-snapshot-20191222.db --name etcd1 -initial-cluster=etcd1=https://172.20.19.16:2380,etcd2=https://172.20.19.18:2380,etcd3=https://172.20.19.19:2380 --initial-cluster-token etcd-cluster --initial-advertise-peer-urls https://172.20.19.16:2380 --data-dir=/var/lib/etcd/data ETCDCTL_API=3 etcdctl snapshot restore etcd-snapshot-20191222.db --name etcd2 -initial-cluster=etcd1=https://172.20.19.16:2380,etcd2=https://172.20.19.18:2380,etcd3=https://172.20.19.19:2380 --initial-cluster-token etcd-cluster --initial-advertise-peer-urls https://172.20.19.18:2380 --data-dir=/var/lib/etcd/data ETCDCTL_API=3 etcdctl snapshot restore etcd-snapshot-20191222.db --name etcd3 -initial-cluster=etcd1=https://172.20.19.16:2380,etcd2=https://172.20.19.18:2380,etcd3=https://172.20.19.19:2380 --initial-cluster-token etcd-cluster --initial-advertise-peer-urls https://172.20.19.19:2380 --data-dir=/var/lib/etcd/data
检查数据
1 ETCDCTL_API=3 etcdctl --cacert=/etc/kubernetes/ssl/ca.pem --cert=/etc/etcd/ssl/etcd.pem --key=/etc/etcd/ssl/etcd-key.pem --endpoints=https://172.20.19.16:2379,https://172.20.19.18:2379,https://172.20.19.19:2379 endpoint health
重启 kube-apiserver
1 2 3 systemctl restart kube-apiserver # mv /etc/kubernetes/manifests.bak /etc/kubernetes/manifests # 当使用 kubeadm 时
Usage of EmptyDir volume “cache-volume” exceeds the limit “1Gi” 当前 pod 需要使用 /dev/shm. 写入的数据量超过了限制导致 pod 被驱逐
配置文件示例
1 2 3 4 5 6 7 8 9 10 11 12 13 14 15 16 17 18 apiVersion: v1 kind: Pod metadata: name: test-pd-shm spec: containers: - image: busybox name: busybox-test command: [ "sleep", "1000000" ] imagePullPolicy: "IfNotPresent" volumeMounts: - mountPath: /dev/shm name: cache-volume volumes: - emptyDir: medium: Memory sizeLimit: 1Gi name: cache-volume
可以不设置 sizeLimit , 或考虑业务场景 设置一个 合理的值(最好不超过宿主机内存的一半)
timeout expired waiting for volumes to attach or umount for pod xxx 当前容器内用户使用的 A 用户,宿主机目录所属用户为 B 用户。A 用户没有权限读取 B 用户目录下的文件。
将目录权限设置为 777 解决, 或者修改 镜像 将用户改为 B 用户
tls: failed to verify client’s certificate: x509: certificate has expired or is not yet valid 生成证书的机器时间要比服务器时间快,导致服务器验证时,证书超出了时间使用范围。
2、或者直接调整生成证书的机器时间,小于服务器的时间
date -s "2022-08-23 01:01:01"
failed to check network namespace closed: remove netns:unlinkat *: device or resource busy 在CentOS7.4引入了一个新的参数来控制内核的行为。 /proc/sys/fs/may_detach_mounts 默认设置为0;当系统有容器运行的时候,需要将该值设置为1
1 echo 1 > /proc/sys/fs/may_detach_mounts
或者 写文件
1 fs.may_detach_mounts = 1
sysctl -p /etc/sysctl.d/95-k8s-sysctl.conf
ceph问题pvc 一直处于 pending describe 发现没有 ceph 的 replicapool
1 failed to provision volume with StorageClass "rook-ceph-block-retain": rpc error: code = Internal desc = pool not found: pool (replicapool) not found in Ceph cluster
创建 ceph osd pool create replicapool 64 64
使用主机网络 ,pid ,root用户 1 2 3 4 5 6 7 8 9 hostIPC: true hostNetwork: true hostPID: true nodeName: 192.168.2.132 ......... securityContext: privileged: true readOnlyRootFilesystem: false runAsUser: 0
查看进程属于哪个容器 containerd
可能需要安装 jq
1 2 3 4 5 6 [root@test-2 test]# ps -ef |grep 30846 root 30846 29837 0 May24 ? 00:00:43 bird -R -s /var/run/calico/bird.ctl -d -c /etc/calico/confd/config/bird.cfg [root@test-2 test]# cat /proc/30846/mountinfo |grep etc-hosts 3688 3666 253:0 /var/lib/kubelet/pods/b00ca34a-d0cb-4654-bee7-34050798d5cb/etc-hosts /etc/hosts rw,relatime - xfs /dev/mapper/bigcloud--enterprise--linux--for--euler-root rw,attr2,inode64,noquota [root@test-2 test]# crictl ps -o json | jq '.[][].labels | select (.["io.kubernetes.pod.uid"] == "b00ca34a-d0cb-4654-bee7-34050798d5cb") | .["io.kubernetes.pod.name"]'|uniq "calico-node-8kbf5"
helm (install/upgrade/rollback) is in progress 1 2 3 4 5 6 7 8 9 10 11 12 13 14 [root@test-2 k8s-test]# /etc/kubeasz/bin/helm upgrade prometheus --install -n monitor -f /etc/kubeasz/clusters/k8s-test/yml/prom-values.yaml /etc/kubeasz/roles/cluster-addon/files/kube-prometheus-stack-45.23.0.tgz Error: UPGRADE FAILED: another operation (install/upgrade/rollback) is in progress [root@test-2 k8s-test]# /etc/kubeasz/bin/helm history -n monitor prometheus REVISION UPDATED STATUS CHART APP VERSION DESCRIPTION 1 Tue May 23 15:59:40 2023 superseded kube-prometheus-stack-45.23.0 v0.63.0 Install complete 2 Tue May 23 16:15:54 2023 superseded kube-prometheus-stack-45.23.0 v0.63.0 Upgrade complete 3 Wed May 24 12:30:29 2023 deployed kube-prometheus-stack-45.23.0 v0.63.0 Upgrade complete 4 Wed May 24 12:31:55 2023 pending-upgrade kube-prometheus-stack-45.23.0 v0.63.0 Preparing upgrade [root@test-2 k8s-test]# /etc/kubeasz/bin/helm rollback -n monitor prometheus 3 # 回退版本 Rollback was a success! Happy Helming! [root@test-2 k8s-test]# /etc/kubeasz/bin/helm upgrade prometheus --install -n monitor -f /etc/kubeasz/clusters/k8s-test/yml/prom-values.yaml /etc/kubeasz/roles/cluster-addon/files/kube-prometheus-stack-45.23.0.tgz Release "prometheus" has been upgraded. Happy Helming!
calico 换 flannel 多网卡下
1 2 - name: IP_AUTODETECTION_METHOD value: "interface=bond0" #(使用ip a查看网卡配置)
换成flannel后提示plugin type=”calico” failed (add): error getting ClusterInformation: resource does not exist: ClusterInformation(default) with error:
1 2 3 4 5 6 7 8 kubectl delete -f calico.yaml # k8s 节点 rm -rf /etc/cni/net.d/* # 最好只删 calico 相关 rm -rf /var/lib/cni/calico systemctl restart kubelet.service kubectl apply -f flannel.yaml
配置非 NetworkManager 受管设备 1 2 3 4 5 6 7 cat > /etc/NetworkManager/conf.d/99-unmanaged-devices.conf <<EOF [keyfile] unmanaged-devices=interface-name:cali*;interface-name:flannel*;interface-name:tunl*;interface-name:docker0;interface-name:cni0; EOF systemctl reload NetworkManager nmcli device status
修复 ssl/tls 漏洞 SSL/TLS 协议信息泄露漏洞 (CVE-2016-2183) 具体是使用了 3DES, 以 kube-apiserver 为例
修改前
1 2 3 4 5 6 7 8 9 10 11 12 13 14 15 16 17 18 19 20 21 22 23 24 25 26 27 28 29 30 31 32 33 34 35 36 [root@test-61 ~]# nmap --script ssl-enum-ciphers -p 6443 172.20.19.61 Starting Nmap 7.93 ( https://nmap.org ) at 2022-08-01 15:28 CST Nmap scan report for 172.20.19.61 Host is up (0.00033s latency). PORT STATE SERVICE 6443/tcp open sun-sr-https | ssl-enum-ciphers: | TLSv1.2: | ciphers: | TLS_ECDHE_RSA_WITH_AES_128_GCM_SHA256 (secp256r1) - A | TLS_ECDHE_RSA_WITH_CHACHA20_POLY1305_SHA256 (secp256r1) - A | TLS_ECDHE_RSA_WITH_AES_256_GCM_SHA384 (secp256r1) - A | TLS_ECDHE_RSA_WITH_AES_128_CBC_SHA (secp256r1) - A | TLS_ECDHE_RSA_WITH_AES_256_CBC_SHA (secp256r1) - A | TLS_RSA_WITH_AES_128_GCM_SHA256 (rsa 2048) - A | TLS_RSA_WITH_AES_256_GCM_SHA384 (rsa 2048) - A | TLS_RSA_WITH_AES_128_CBC_SHA (rsa 2048) - A | TLS_RSA_WITH_AES_256_CBC_SHA (rsa 2048) - A | TLS_ECDHE_RSA_WITH_3DES_EDE_CBC_SHA (secp256r1) - C | TLS_RSA_WITH_3DES_EDE_CBC_SHA (rsa 2048) - C | compressors: | NULL | cipher preference: server | warnings: | 64-bit block cipher 3DES vulnerable to SWEET32 attack | TLSv1.3: | ciphers: | TLS_AKE_WITH_AES_128_GCM_SHA256 (ecdh_x25519) - A | TLS_AKE_WITH_AES_256_GCM_SHA384 (ecdh_x25519) - A | TLS_AKE_WITH_CHACHA20_POLY1305_SHA256 (ecdh_x25519) - A | cipher preference: server |_ least strength: C MAC Address: FA:96:38:B0:A6:00 (Unknown) Nmap done: 1 IP address (1 host up) scanned in 1.11 seconds
修改配置重启 /etc/systemd/system/kube-apiserver.service;
新加内容
1 --tls-cipher-suites=TLS_ECDHE_RSA_WITH_AES_128_GCM_SHA256,TLS_ECDHE_RSA_WITH_AES_256_GCM_SHA384
配置这两项即可,也可以把上面的依次添加,删掉 3DES 相关的配置
完整内容
1 2 3 4 5 6 7 8 9 10 11 12 13 14 15 16 17 18 19 20 21 22 23 24 25 26 27 28 29 30 31 32 33 34 35 36 37 38 39 40 41 42 43 44 45 46 [Unit] Description=Kubernetes API Server Documentation=https://github.com/GoogleCloudPlatform/kubernetes After=network.target [Service] ExecStart=/opt/kube/bin/kube-apiserver \ --allow-privileged=true \ --anonymous-auth=false \ --api-audiences=api,istio-ca \ --authorization-mode=Node,RBAC \ --bind-address=172.20.19.61 \ --client-ca-file=/etc/kubernetes/ssl/ca.pem \ --endpoint-reconciler-type=lease \ --etcd-cafile=/etc/kubernetes/ssl/ca.pem \ --etcd-certfile=/etc/kubernetes/ssl/kubernetes.pem \ --etcd-keyfile=/etc/kubernetes/ssl/kubernetes-key.pem \ --etcd-servers=https://172.20.19.61:2379,https://172.20.19.62:2379,https://172.20.19.63:2379 \ --kubelet-certificate-authority=/etc/kubernetes/ssl/ca.pem \ --kubelet-client-certificate=/etc/kubernetes/ssl/kubernetes.pem \ --kubelet-client-key=/etc/kubernetes/ssl/kubernetes-key.pem \ --tls-cipher-suites=TLS_ECDHE_RSA_WITH_AES_128_GCM_SHA256,TLS_ECDHE_RSA_WITH_AES_256_GCM_SHA384 \ # 添加内容 --secure-port=6443 \ --service-account-issuer=https://kubernetes.default.svc \ --service-account-signing-key-file=/etc/kubernetes/ssl/ca-key.pem \ --service-account-key-file=/etc/kubernetes/ssl/ca.pem \ --service-cluster-ip-range=10.68.0.0/16 \ --service-node-port-range=30000-32767 \ --tls-cert-file=/etc/kubernetes/ssl/kubernetes.pem \ --tls-private-key-file=/etc/kubernetes/ssl/kubernetes-key.pem \ --requestheader-client-ca-file=/etc/kubernetes/ssl/ca.pem \ --requestheader-allowed-names= \ --requestheader-extra-headers-prefix=X-Remote-Extra- \ --requestheader-group-headers=X-Remote-Group \ --requestheader-username-headers=X-Remote-User \ --proxy-client-cert-file=/etc/kubernetes/ssl/aggregator-proxy.pem \ --proxy-client-key-file=/etc/kubernetes/ssl/aggregator-proxy-key.pem \ --enable-aggregator-routing=true \ --v=2 Restart=always RestartSec=5 Type=notify LimitNOFILE=65536 [Install] WantedBy=multi-user.target
检验
1 2 3 4 5 6 7 8 9 10 11 12 13 14 15 16 17 18 19 20 21 22 23 24 [root@test-61 ~]# nmap --script ssl-enum-ciphers -p 6443 172.20.19.61 Starting Nmap 7.93 ( https://nmap.org ) at 2023-08-01 15:33 CST Nmap scan report for test-61 (172.20.19.61) Host is up (0.00021s latency). PORT STATE SERVICE 6443/tcp open sun-sr-https | ssl-enum-ciphers: | TLSv1.2: | ciphers: | TLS_ECDHE_RSA_WITH_AES_128_GCM_SHA256 (secp256r1) - A | TLS_ECDHE_RSA_WITH_AES_256_GCM_SHA384 (secp256r1) - A | compressors: | NULL | cipher preference: server | TLSv1.3: | ciphers: | TLS_AKE_WITH_AES_128_GCM_SHA256 (ecdh_x25519) - A | TLS_AKE_WITH_AES_256_GCM_SHA384 (ecdh_x25519) - A | TLS_AKE_WITH_CHACHA20_POLY1305_SHA256 (ecdh_x25519) - A | cipher preference: server |_ least strength: A Nmap done: 1 IP address (1 host up) scanned in 0.75 seconds
etcd , k8s 其他组件修复方式相似
etcd 添加的配置
1 --cipher-suites=TLS_ECDHE_RSA_WITH_AES_128_GCM_SHA256,TLS_ECDHE_RSA_WITH_AES_256_GCM_SHA384
kube-controller kube-scheduler kubelet 和 kube-apiserver 处理方式一样
pod 创建 pid 受到限制 报错 libgomp: Thread creation failed: Resource temporarily unavailable
查看信息,说是 创建的 pid 默认是 1024。首先确保系统层面没限制
/etc/security/limits.conf
1 2 3 4 5 6 #配置 文件句柄数 * soft nofile 65536 * hard nofile 131072 #配置 内存锁定交换 * soft memlock unlimited * hard memlock unlimited
另外的文件 /etc/security/limits.d/20-nproc.conf
1 2 3 4 5 6 7 8 9 10 11 12 13 14 # Default limit for number of user's processes to prevent # accidental fork bombs. # See rhbz #432903 for reasoning. * soft nproc unlimited root soft nproc unlimited test soft nproc unlimited * hard nproc unlimited root hard nproc unlimited test hard nproc unlimited * hard memlock unlimited * soft memlock unlimited * soft core unlimited * hard core unlimited
改完后查看
1 2 3 4 5 6 7 8 9 10 11 12 13 14 15 16 17 [root@172-20-60-113 log]# sysctl -p ; ulimit -a core file size (blocks, -c) unlimited data seg size (kbytes, -d) unlimited scheduling priority (-e) 0 file size (blocks, -f) unlimited pending signals (-i) 966484 max locked memory (kbytes, -l) unlimited max memory size (kbytes, -m) unlimited open files (-n) 65536 pipe size (512 bytes, -p) 8 POSIX message queues (bytes, -q) 819200 real-time priority (-r) 0 stack size (kbytes, -s) 8192 cpu time (seconds, -t) unlimited max user processes (-u) unlimited virtual memory (kbytes, -v) unlimited file locks (-x) unlimited
查看进程的限制,没有限制
1 2 3 4 5 6 7 8 9 10 11 12 13 14 15 16 17 18 [root@172-20-60-113 limits.d]# cat /proc/24571/limits Limit Soft Limit Hard Limit Units Max cpu time unlimited unlimited seconds Max file size unlimited unlimited bytes Max data size unlimited unlimited bytes Max stack size 8388608 unlimited bytes Max core file size 0 unlimited bytes Max resident set unlimited unlimited bytes Max processes 966484 966484 processes Max open files 1048576 1048576 files Max locked memory 65536 65536 bytes Max address space unlimited unlimited bytes Max file locks unlimited unlimited locks Max pending signals 966484 966484 signals Max msgqueue size 819200 819200 bytes Max nice priority 0 0 Max realtime priority 0 0 Max realtime timeout unlimited unlimited us
但还是报错,pod 内创建的进程还是不能超过 1024
最后修改
1 2 # podPidsLimit: 1024 # 修改为 -1 不限制 podPidsLimit: -1
重启 kubelet 后,进程数也无限制
补 查看 pod 创建的线程ps -T -p 1 如果没有显示可以 在 node 节点上查看 ps -T -p 24571
coredns 配置 自定义
1 2 3 4 5 6 7 8 9 10 11 12 13 14 15 16 17 18 19 20 21 22 23 24 25 26 27 28 29 30 31 32 33 34 35 36 data: Corefile: | .:53 { errors health { lameduck 5s } ready kubernetes cluster.local in-addr.arpa ip6.arpa { pods insecure fallthrough in-addr.arpa ip6.arpa ttl 30 } hosts { 172.20.1.61 test-61 172.20.1.62 test-62 172.20.1.63 test-63 172.20.19.14 test-14 172.20.19.17 test-17 172.20.19.9 test-9 172.20.19.11 test-11 172.20.19.12 test-12 172.20.19.13 test-13 fallthrough } prometheus :9153 forward . 114.114.114.114 8.8.8.8 { # policy random|round_robin|sequential policy sequential max_concurrent 1000 } cache 30 loop reload loadbalance }
或者 写文件或cm
示例写 cm
修改 coredns yaml 文件
1 2 3 4 5 6 7 8 9 10 11 12 13 14 15 16 17 18 19 20 21 22 23 24 25 26 27 28 29 # deployment ... volumeMounts: - mountPath: /etc/add-hosts #新增 name: customer-hosts readOnly: true ... volumes: - configMap: #新增 defaultMode: 420 items: - key: customer-hosts path: customer-hosts name: coredns-customer-hosts name: customer-hosts ... # ConfigMap kubernetes cluster.local in-addr.arpa ip6.arpa { pods insecure fallthrough in-addr.arpa ip6.arpa ttl 30 } # 新增信息 hosts /etc/add-hosts/customer-hosts . { fallthrough . } prometheus :9153
自定义 add-hosts.yaml
1 2 3 4 5 6 7 8 9 apiVersion: v1 data: customer-hosts: | 172.20.1.61 test-61 172.20.1.62 test-62 kind: ConfigMap metadata: name: coredns-customer-hosts namespace: kube-system
或者从文件生成
1 2 cp /etc/hosts ./customer-hosts kubectl -n kube-system create cm customer-hosts --from-file=customer-hosts
无权限操作 /run/containerd/containerd.sock eg: imwl 用户无权限
使用 docker
1 2 3 sudo groupadd docker sudo gpasswd -a $USER docker systemctl restart docker.service
使用 crictl
加入 crontab
1 @reboot /bin/chmod 666 /run/containerd/containerd.sock
或者 修改 启动文件 /etc/systemd/system/containerd.service
添加
1 2 [Service] ExecStartPost=/bin/sh -c "/bin/sleep 5 && /bin/chmod 666 /run/containerd/containerd.sock"
然后重启
1 2 sudo systemctl daemon-reload sudo systemctl restart containerd
使用 config 文件登录 dashboard 报错信息
Internal error (500): Not enough data to create auth info structure.
需要在 config 文件中添加 token 字段
1 2 3 4 5 6 7 8 9 10 11 12 13 14 15 16 17 18 19 20 21 apiVersion: v1 clusters: - cluster: certificate-authority-data: xxx server: https://xxx:6443 name: cluster1 contexts: - context: cluster: cluster1 user: admin name: context-cluster1 current-context: context-cluster1 kind: Config preferences: {} users: - name: admin user: client-certificate-data: xxx client-key-data: xxx # 添加字段 token: xxx
k8s导出所有镜像 1 2 3 4 5 6 7 8 9 10 11 12 13 14 15 16 17 18 19 20 21 22 23 24 25 26 27 28 29 30 31 32 33 34 #!/bin/bash # 获取 Kubernetes 集群中所有 Pod 使用的容器镜像并去重 kubectl get pods --all-namespaces -o jsonpath="{..image}" | tr -s '[[:space:]]' '\n' | sort | uniq > images.txt # 遍历镜像列表并保存为本地 tar 文件 while read -r IMAGE; do # 检查镜像名称是否有效 if [[ -z "$IMAGE" ]]; then continue fi # 构造本地 tar 文件名 TAR_NAME="${IMAGE//\//_}.tar" # 检查镜像是否已存在本地 if ! docker image inspect "$IMAGE" &>/dev/null; then echo "镜像 $IMAGE 不存在本地,尝试拉取..." if ! docker pull "$IMAGE"; then echo "拉取镜像 $IMAGE 失败,跳过该镜像。" continue fi fi # 保存镜像为 tar 文件 echo "正在保存镜像 $IMAGE 到 $TAR_NAME..." if docker save "$IMAGE" > "$TAR_NAME"; then echo "镜像 $IMAGE 保存成功。" else echo "镜像 $IMAGE 保存失败,跳过。" fi done < images.txt echo "所有镜像处理完成!"
获取 secrets-cm 1 2 3 4 5 6 7 8 9 10 11 12 13 14 15 16 17 18 19 20 21 22 23 24 25 26 27 28 29 30 31 32 33 34 35 36 37 38 39 40 41 42 43 44 45 46 47 48 49 50 51 52 53 54 55 56 57 58 59 60 61 62 63 64 65 66 67 68 # cat get-secret-cm.sh #!/bin/bash # 检查是否提供了命名空间参数 if [ -z "$1" ]; then echo "Please provide the namespace as an argument." exit 1 fi NAMESPACE=$1 # 获取所有 Secret 名称 secrets=$(kubectl get secrets -n $NAMESPACE | grep Opaque | awk '{print $1}') # 获取所有 ConfigMap 名称 configmaps=$(kubectl get configmap -n $NAMESPACE | awk '{if(NR>1) print $1}') # 处理 Secret for secret in $secrets; do echo "Processing Secret: $secret" # 获取 Secret 内容并提取 data 部分 data=$(kubectl get secret $secret -n $NAMESPACE -o jsonpath='{.data}') # 检查 data 是否为空 if [ -n "$data" ]; then echo "Secret $secret contains the following data fields:" # 遍历 data 中的每个键值对 for key in $(echo "$data" | jq -r 'keys[]'); do # 提取并解码每个字段的 Base64 内容 encoded_value=$(echo "$data" | jq -r ".[\"$key\"]") decoded_value=$(echo "$encoded_value" | base64 --decode) # 输出解码后的值 echo "$key: $decoded_value" done else echo "Secret $secret contains no data fields" fi echo "---------------------------------" echo echo done # 处理 ConfigMap for cm in $configmaps; do echo "Processing ConfigMap: $cm" # 获取 ConfigMap 内容并提取 data 部分 data=$(kubectl get configmap $cm -n $NAMESPACE -o jsonpath='{.data}') # 检查 data 是否为空 if [ -n "$data" ]; then echo "ConfigMap $cm contains the following data fields:" # 遍历 data 中的每个键值对 for key in $(echo "$data" | jq -r 'keys[]'); do # 输出每个键值对的内容 value=$(echo "$data" | jq -r ".[\"$key\"]") echo "$key: $value" done else echo "ConfigMap $cm contains no data fields" fi echo "---------------------------------" echo echo done